It don’t mean a thing if ain’t got that ping. With apologies to the first lady of song, the late great Ella Fitzgerald, that sums up fish-finder performance. The world’s finest sonar is useless without a transducer that pings and receives the echoes in an effective manner. Ultimately, pings paint the picture of the underwater world. To work well, a transducer requires immersion in water that’s free of air bubbles that cause aeration and result in sonar interference.
Read Next: Airmar TM165HW Wide-Beam Chirp-Ready Transducer
Many transducers are mounted with a bracket on the transom — a convenient location that requires no large holes in the bottom of the boat and eliminates interference with trailer bunks. But this zone is also prone to excessive aeration as H₂O streams out from under the hull and props agitate the water. These transducers demand careful installation. Here are tips for mounting one of the most popular transom-mount models, the Airmar P66 dual-frequency ’ducer (available with a speed and temp sensor) on a sterndrive boat with a 12-degree transom angle. Make sure the connector plug on the cable matches the transducer port for your particular brand of fish finder.
Skill Level: 2 of 5
Finish Time: Approx. 3 hours
Tools and Supplies
- Airmar P66 transom-mount Triducer with speed and temp sensors
- Power drill, drill-bit set and countersink
- Phillips screwdriver
- Straightedge
- 3M 4200 marine sealant
- Electricians snake (for routing cables)
- Masking tape (to secure template)
- Measuring tape
- Stern pad mounting block, to avoid drilling into the transom

Choose the Proper Location
On single-drive boats, Airmar recommends locating the P66 on the side where propeller blades are moving downward, which is usually the starboard-side of a single outboard or sterndrive. It should be as close to the centerline as possible but at least 3 inches outside the swing radius of the prop blades. For twin drives, mount the transducer between the drives. Avoid areas abaft through-hull fittings or pickups that create turbulence. If you opted for a speed sensor, connect the cable to the fish finder and spin the paddle wheel to ensure it reads. Make sure there is a relatively accurate (ambient air) temp reading. If not, return it to your place of purchase.
Tip: An alternate to drilling holes in the transom, especially on aluminum boats, is to use a King Starboard (poly) block such as a Stern Saver to accept the retaining hardware. The block gets glued to the hull with a special adhesive, and hardware gets screwed into the block.
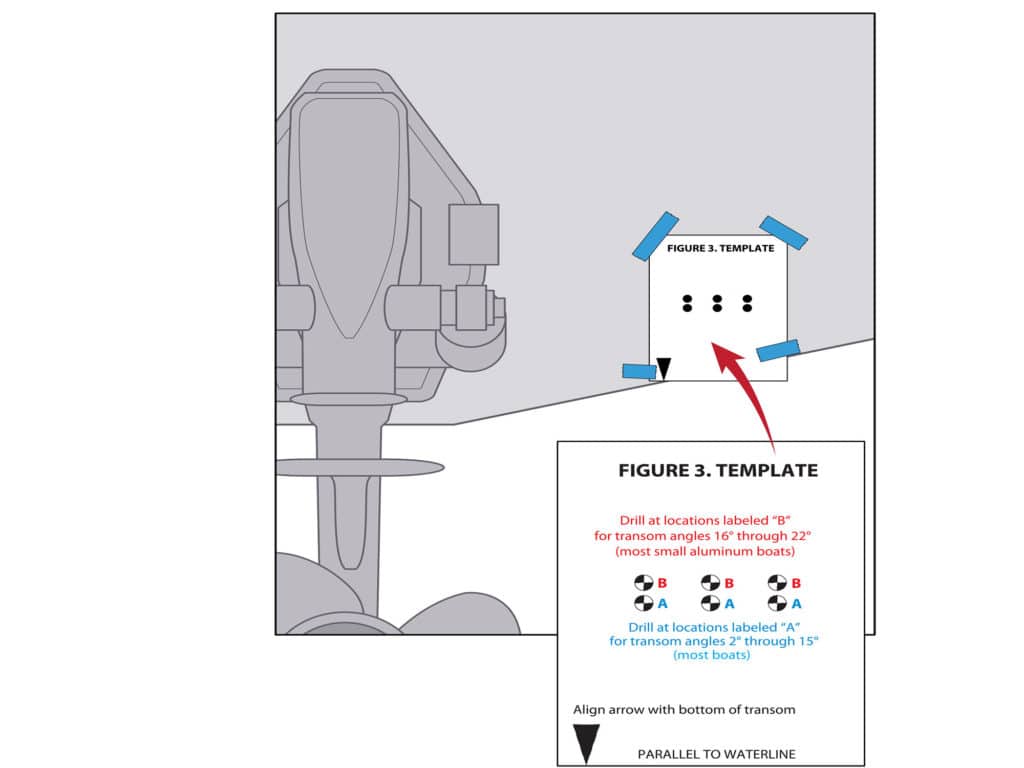
Use the Template to Position the Bracket
Cut out the supplied template and position it so the arrow at the bottom is aligned with the bottom edge of the transom. Be sure the template is parallel with the waterline, then tape it in place. Using a 9/64-inch bit, drill three holes 7/8-inch deep at the marked locations. To prevent from drilling too deeply, wrap masking tape around the bit 7/8-inch from the point. To minimize gelcoat cracking, run the drill in reverse until the gelcoat is penetrated. After drilling, lightly chamfer each hole with a countersink bit to prevent further cracking. Drill holes 90 degrees to the angled transom surface, not horizontally, to ensure that the screw heads sit flush with the bracket.
Tip: Drill the holes at position B on the template for hulls with reverse transom slopes of between 16 and 22 degrees. Use position A to drill holes if the slope is between 2 and 15 degrees.
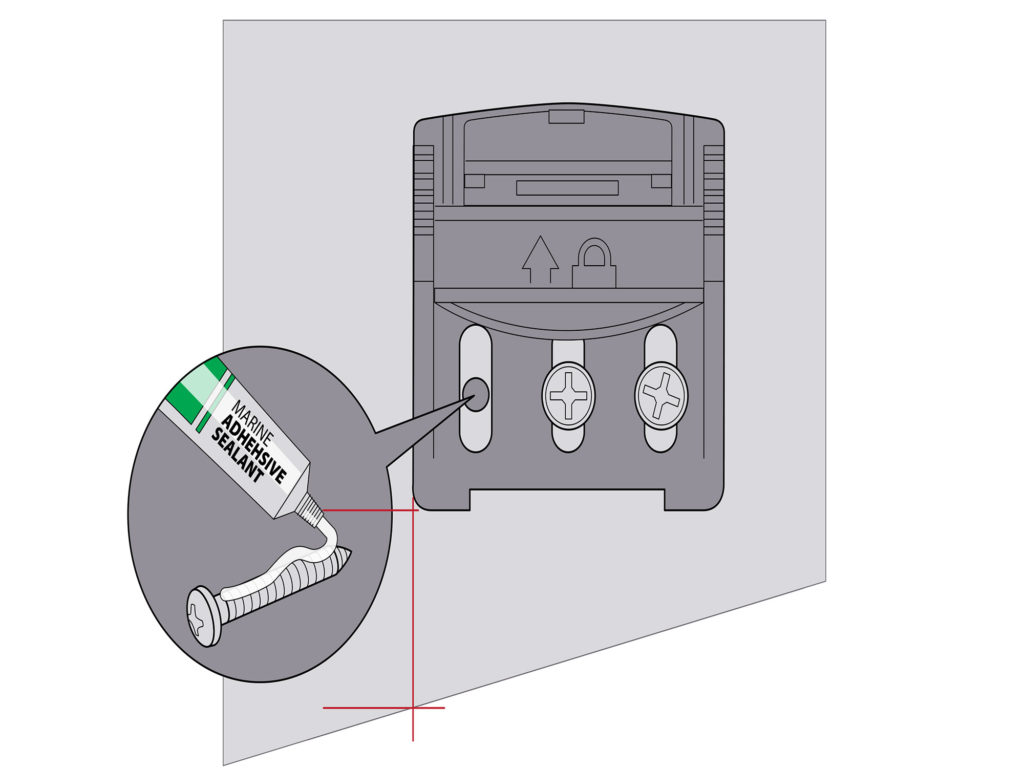
Mount the Transducer Bracket
With the bracket removed, apply marine sealant such as 3M 4200 (suitable for below-the-waterline applications) to the supplied three No. 10-by-1 3/4-inch self-tapping stainless-steel screws. Also squeeze sealant into each of the three mounting holes that you drilled in the previous step. Use a manual Phillips screwdriver to screw the bracket into the transom, but don’t completely tighten screws at this point. Slide the bracket up or down in the slotted adjustment holes until the distance from the bottom left corner and bottom of the transom is 1 1/2 inches. Then make sure the bottom of the bracket is parallel with the waterline. At this point, tighten the screws.
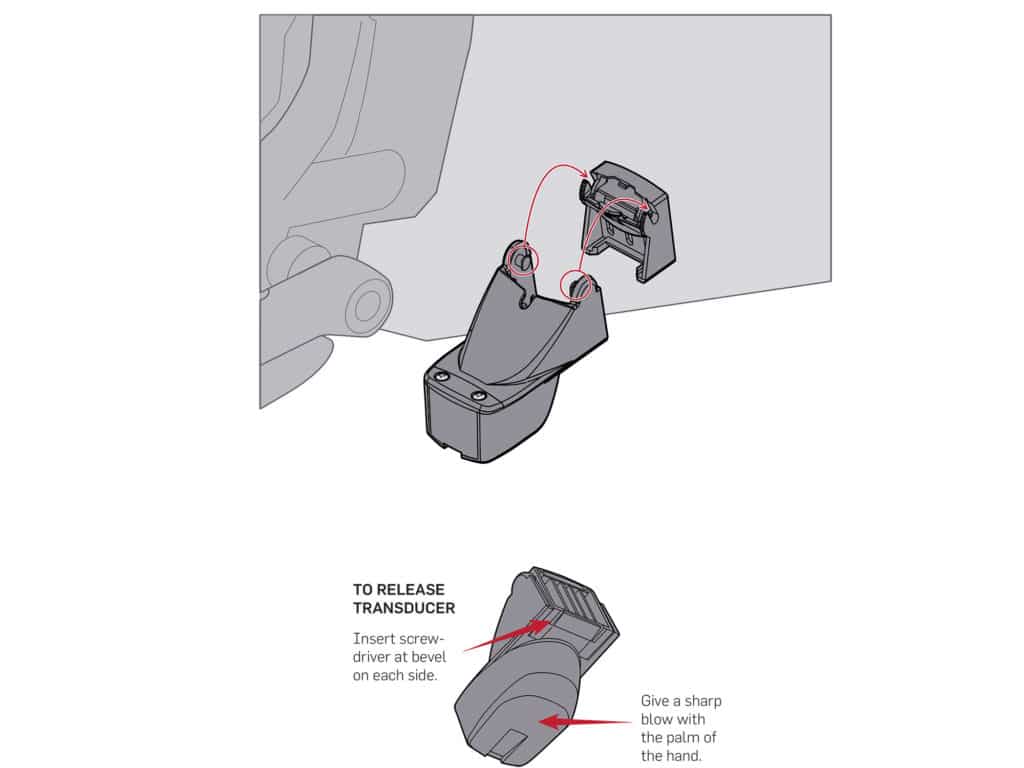
Attach the Transducer
Open the retaining cover on the top of the transducer bracket by depressing the latch and rotating the cover downward. Then insert the transducer’s pivot posts into the slots on the top the bracket. With posts in position, push down on the transducer to click the posts in place. Rotate the transducer downward until it snaps into the bracket. Close the retaining cover. Install the paddle-wheel speed sensor, if you have one. Route the transducer cable to the fish finder. If it is necessary to drill through the transom to route the cable, be sure to use the supplied cable cap and sealant to prevent water intrusion. Use cable clamps to secure the cable along the length of its run.
Tip: If you need to release the transducer from the bracket, use a sharp upward blow with your palm on the underside of the ’ducer. This allows access to the mounting screws if you need to adjust the height. If the transducer accidentally gets latched before mounting to the transom, slots on each side of the bracket allow a screwdriver to be inserted, releasing the bracket.

